Project Solaris Daily Action Cards Explained
Each morning offers three cards. Know what Battle, Rest, Learn, Shopkeeping, Social, and Development actually buy you.
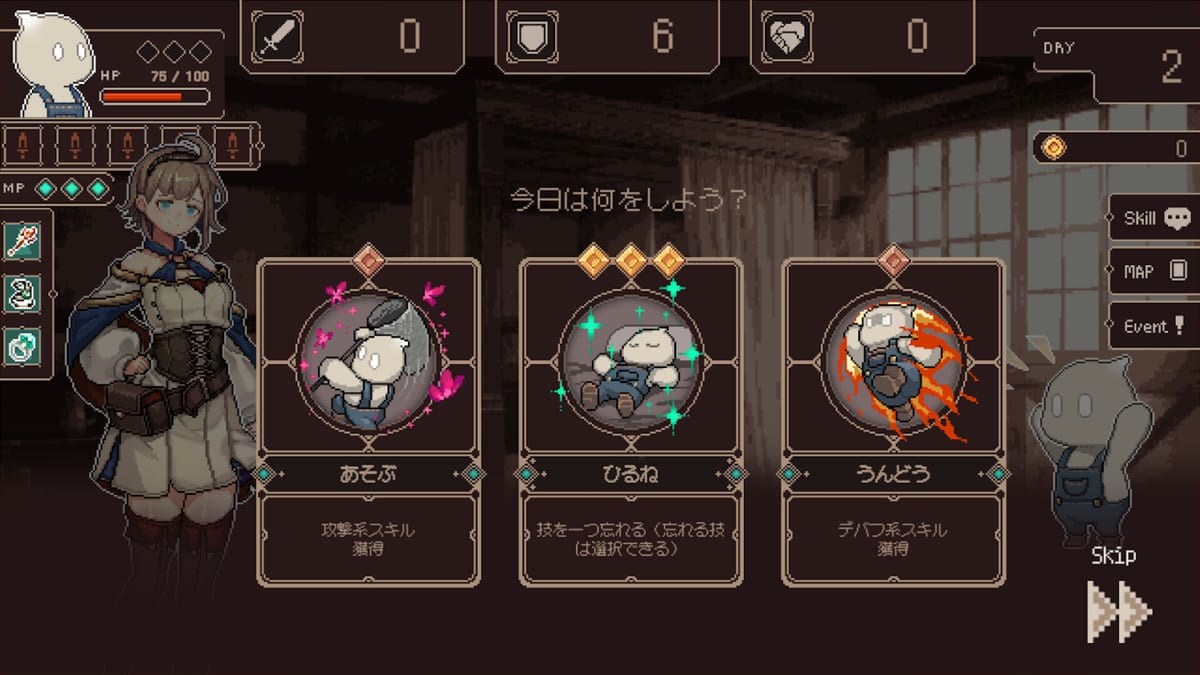
Every morning in Project Solaris you choose one of three action cards. That single pick advances the 100-day calendar and reshapes combat readiness, cash, Trust with Hom, skill coverage, and which story threads stay alive. This guide explains each major card type — Battle / Combat, Rest, Learn skill, Shopkeeping (店番 minigame), Social / 交流, and Development / 開発 — when to take which offer, the opportunity cost of saying no, and how picks tie into unlocks and endings. Use it beside 100-Day Strategy, Trial Bosses, Shopkeeping, Trust and Bond, Supporting Cast, and Endings.
How to read a three-card offer
Score each card against four resources before you click:
- Combat readiness — Can Hom yellow what tomorrow’s fight needs?
- Money — Can you fund the next Solaris buy or Hom craft batch?
- Trust / Reliability — Are hard skills still gated?
- Skill coverage — Did you Learn something you will actually practice before the next gate?
Pick the card that repairs the lowest score unless a hard calendar flag (Day 10 elites, ~20-day Trial, Day 100) forces warm-up Battle or Rest. Fun-looking cards that ignore the empty bar are how players arrive at ceremony week broke, untrusted, and overcaffeinated on Rest debt.
Battle / Combat
What it buys: loot and materials, enemy pattern reps, and — most importantly — QTE practice for yellow and red gauges.
Take Battle when: readiness or click rust is the bottleneck; you need drops for crafts; a Trial is two days away and fingers are cold after Shopkeeping.
Opportunity cost: no steady shop wages, no Trust growth, no Rest recovery, no new Learn installs. All-Battle intervals create rich corpses with cracked gauges.
Story note: some combat days also advance pressure flags that keep milestone routes alive for Endings, but Battle is not a substitute for Social when a cast thread is the real goal.
Rest
What it buys: stamina and click quality. Rest is the anti-tilt card after black gauges become normal.
Take Rest when: recent fights sprayed misses; you feel yourself greeding red out of frustration; tomorrow is a Trial and today would be a messy pride Battle.
Opportunity cost: zero progress on money, Trust, skills, or story. Rest-spamming wastes the 100-day clock; Rest-starving wastes the clock harder via wipes.
Rule of thumb: Rest is a tool the night before a gate or after a brutal ceremony — not a lifestyle.
Learn skill
What it buys: new Hom commands and kit coverage.
Take Learn when: your skill bar is the empty resource and you still have days left to practice the new command in Battle before Day 10, Day 20/40/60/80, or Day 100 (Trial Bosses).
Opportunity cost: a Learn day without follow-up Battle installs a museum piece. Learning three Trust-gated skills while Reliability is flat creates a black factory (Combat QTE).
Pairing: Learn → Battle practice → only then put the skill on a ceremony plan. Never Learn on the morning of a Trial.
Shopkeeping (店番)
What it buys: steadier gold and crafting fuel via the shop minigame / earn-money day. Deep economy tactics live on Shopkeeping.
Take Shopkeeping when: money is the lowest score; you need lead time for Hom crafts or a Solaris breakpoint before ceremony week.
Opportunity cost: no QTE reps, no Trust, easy to over-shop into Day 10 with rusty hands. Always schedule a warm-up Battle after a shop block if a gate is near.
Timing: best in the first half of a ~20-day interval so gear exists for ceremony week — not the morning of the boss.
Social / 交流
What it buys: relationship progress, side-story momentum, and often the Trust / Reliability growth that makes hard QTEs fair. Full bond systems: Trust and Bond. Cast faces and route gravity: Supporting Cast.
Take Social when: Trust lags behind your Learned skills; you are seeding an ending-facing thread with Tetia, Croisé, August, Melchior, or another focus; a scene offer is clearly time-sensitive.
Opportunity cost: a Social day is not a craft day or a warm-up Battle. All-Social calendars fail Trials; zero-Social calendars can clear mechanically and still miss branches (Endings).
Discipline: pick one cast focus per run when the calendar is tight. Depth beats tourist check-ins.
Development / 開発
What it buys: longer-horizon growth — character or system development that is adjacent to Social but more “build the person / project” than a pure visit. In offers, Development often competes with Social for the same scarce non-combat slot.
Take Development when: the card text clearly advances a growth flag you care about (skill identity, Hom partnership depth, island projects) and Trust or story milestones need that flag more than another Battle.
Opportunity cost: same family as Social — you are spending a day that could have been Shopkeeping or Rest. Do not treat Development as free power; audit whether the growth lands before the next Trial.
If Social and Development both appear: choose the one that repairs your stated run goal (bond floor versus project/milestone flag). When unsure and Trust is low, Social is usually the safer combat-adjacent pick.
Opportunity-cost matrix (quick)
| If you are… | Prefer | Avoid for now |
|---|---|---|
| Broke before a Trial | Shopkeeping | Luxury Social tourism |
| Missing hard QTEs | Social / Development, then practice Battle | More Learn |
| Sloppy clicks | Rest, then easy Battle | Red-greed Battle |
| Empty skill bar mid-interval | Learn, then Battle | Shop-only weeks |
| Gate in two days, resources OK | Warm-up Battle or Rest | Experimental crafts |
Story unlock ties
Daily cards are how side scenarios appear. Showing up for Social / Development offers can open sub-stories that alter Endings. Surviving Battle gates keeps milestone routes alive. Shopkeeping can overlap with August-facing economy fantasy without replacing intentional cast days. None of this requires spoiler checklists — it requires intentional picks instead of coin flips.
Achievement hunters should note that card-milestone badges often reward exploring these systems across multiple saves; plan that on Achievements after a first clear, not instead of ceremony prep.
Worked micro-example
Suppose Days 21–28 after a messy Day 20 Trial: Trust low, wallet OK, clicks shaky. Offers across the week might correctly resolve as Rest → Social → Battle (yellow only) → Learn (one skill) → Battle practice → Shopkeeping → Social → warm-up Battle into the next block — not seven Battles because “bosses need damage.”
Related reading
- 100-Day Strategy
- Trial Bosses
- Shopkeeping
- Trust and Bond
- Combat QTE
- Endings
- Supporting Cast
- Achievements
- Day Planner
- Guides Hub
Read the three cards. Name the empty resource. Spend the day on purpose. That habit clears more Trial Ceremonies than any single expensive purchase.
Frequently Asked Questions
Quick answers for Project Solaris players.
What daily action cards exist in Project Solaris?
Common offers include Battle/Combat, Rest, Learn skill, Shopkeeping (店番), Social (交流), and Development (開発). Each morning you pick one of three cards.
Should I always pick Battle?
No. Rotate toward the lowest resource — money, Trust, skills, or stamina — unless a nearby elite or Trial forces warm-up or Rest.
When is Shopkeeping better than fighting?
When gold is the bottleneck and you still have lead time before ceremony week. Warm up with Battle afterward so QTEs are not cold.
What is the difference between Social and Development?
Social focuses on visits and relationship/Trust momentum; Development leans into longer-horizon growth flags. Both spend a scarce non-combat day — pick the one that matches your run goal.
Do daily cards affect endings?
Yes. Social and Development offers often seed side stories, while surviving Battle milestones keeps routes alive. See the Endings and Supporting Cast pages.
Where should I plan a full 20-day mix?
Use 100-Day Strategy and the Day Planner for ratios, Trial Bosses for gate checklists, and this page for what each card actually purchases.